Getting started
该章节将会初步介绍Reactor是什么,以及如何快速的在项目中实施
reactor是基于模块化的思想构建和实现的。通过reactor可以将一系列业务整合到一个模块(module)里面,而各个业务的实现形成一次交互(interaction),各个模块和interaction是相互独立的,所以可以达到项目的解耦以及提高各个业务实现的重用性。下图是整个reactor的架构图:
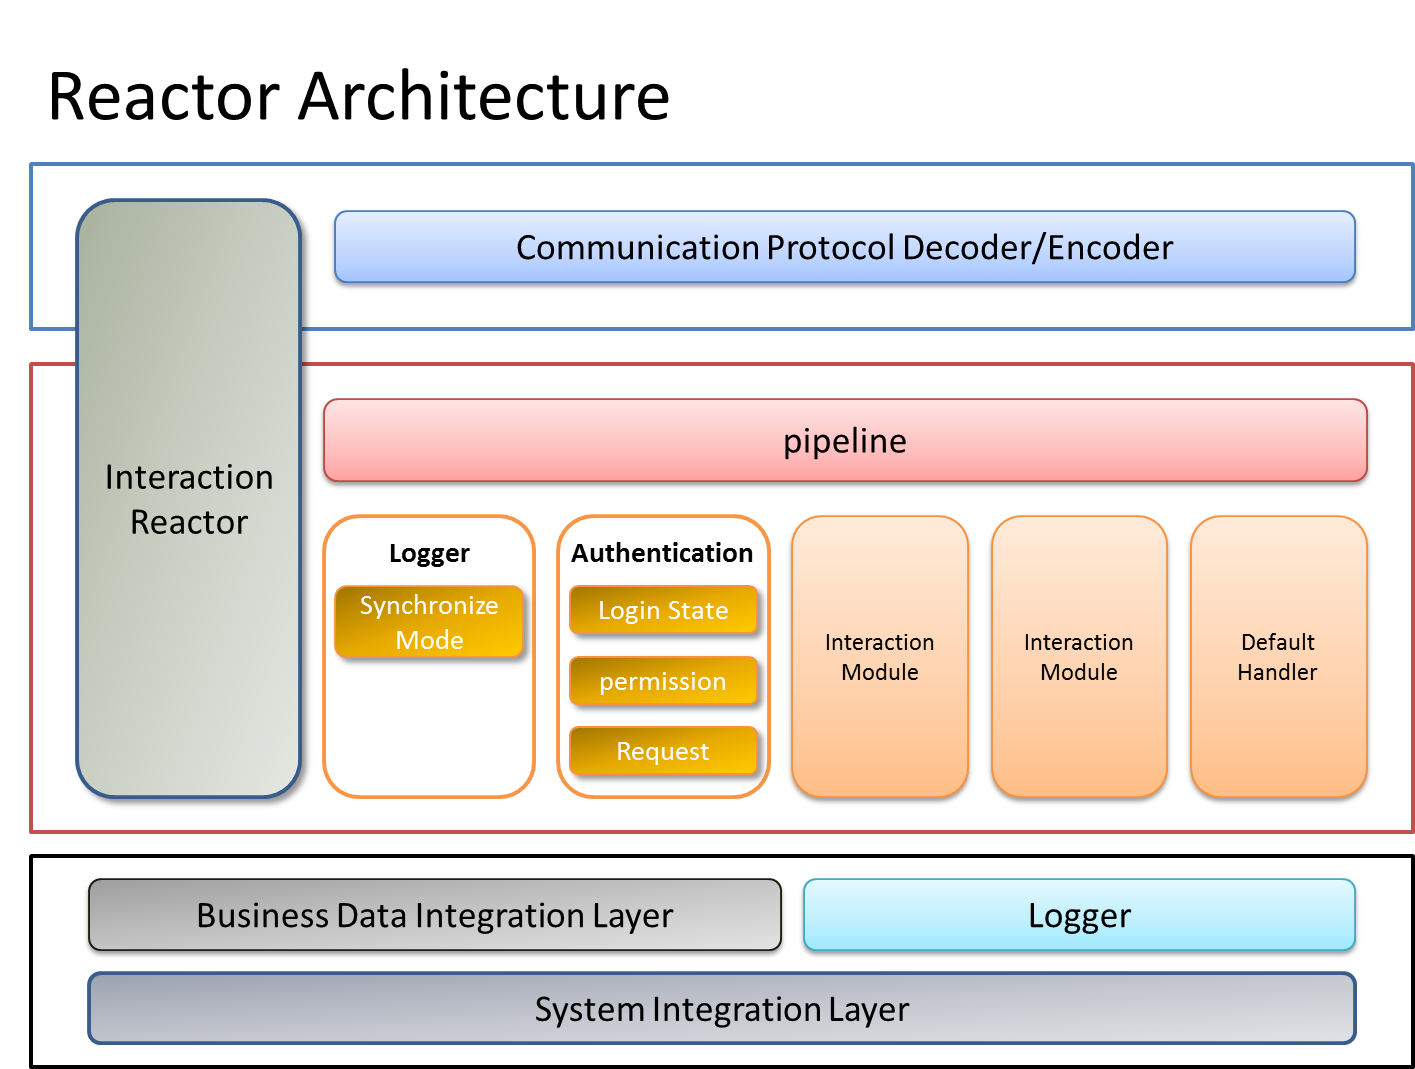
上图可以看到整个reactor是遵循分层的架构,位于中间层,其中interaction reactor是上次解码层和reactor内部的入口。通过它的pipeline下发到某个处理具体请求的interaction module,其中logger,以及authentication也是一个module,这些module均挂载在pipeline中。上面说了,module中包含具体的业务实现(interaction),如果一个请求落到某个module之后,那么将会在该module中路由到某个业务实现(interaction)上。
一、引入Maven依赖
1、引入reactor的所有模块
 <dependency>
      <groupId>com.pinganfu.mobile</groupId>
      <artifactId>reactor-all</artifactId>
      <version>${reactor.version}</version>
 </dependency>
2、分模块引入
<!--reactor核心模块-->
 <dependency>
      <groupId>com.pinganfu.mobile.reactor</groupId>
      <artifactId>reactor-frm</artifactId>
      <version>${reactor.version}</version>
 </dependency>
<!--reactor mtp基础公共模块,包含校验和日志-->
 <dependency>
      <groupId>com.pinganfu.mobile.reactor</groupId>
      <artifactId>reactor-comm</artifactId>
      <version>${reactor.version}</version>
 </dependency>
<!--reactor 监控模块-->
 <dependency>
      <groupId>com.pinganfu.mobile.reactor.monitor</groupId>
      <artifactId>collector</artifactId>
      <version>${reactor.version}</version>
 </dependency>
二、在spring的xml配置文件中引入reactor的namespace
<beans xmlns="http://www.springframework.org/schema/beans"
       xmlns:xsi="http://www.w3.org/2001/XMLSchema-instance"
       xmlns:reactor="http://mobile.pinganfu.com/schema/reactor"
       xsi:schemaLocation="http://www.springframework.org/schema/beans http://www.springframework.org/schema/beans/spring-beans-2.5.xsd
    http://mobile.pinganfu.com/schema/reactor http://mobile.pinganfu.com/schema/reactor/reactor.xsd">
</beans>
三、开启reactor
<reactor:reactor id="demo-reactor" systemName="hello" asynchronous="true" acceptorThreads="1" serviceThreads="100"/>
往你的spring的xml配置文件中添加上面一段配置
配置属性说明:
systemName:表示当前应用的名称,比如MTP
asynchronous:表示开启异步模式,所有经过reactor来处理的请求,均是采用异步方式处理
acceptorThreads:接受请求的线程数量
serviceThreads:所有处理业务的线程数量
四、配置你第一个交互(interaction)
 <reactor:javaInteraction operationPath="first_module/first" minVer="3.2.2" maxVer="3.3.3" clientType="android" checkLoginState="false"  id="firstInteraction" class="com.pinganfu.mobile.reactor.FirstInteraction">
</reactor:javaInteraction>
上面内容添加到spring的xml中
配置属性说明:
operationPath:当前交互能够处理请求的绝对路径
minVer/maxVer:当前交互能够处理的最小版本和最大版本区间,默认是,表示处理所有版本
clientType:能够处理的客户端类型,默认是,表示所有客户端类型
checkLoginState:当前交互是否需要校验登录态,默认是true
id:一个交互的唯一标识
class:交互实现类的全路径
业务交互实现:
package com.pinganfu.mobile.reactor;

import com.pinganfu.mobile.reactor.frm.export.ClientType;
import com.pinganfu.mobile.reactor.frm.export.action.Action;
import com.pinganfu.mobile.reactor.frm.export.action.ActionAdapter;
import com.pinganfu.mobile.reactor.frm.export.action.AsyAction;
import com.pinganfu.mobile.reactor.frm.export.action.AsyActionCallBack;
import com.pinganfu.mobile.reactor.frm.future.Future;
import com.pinganfu.mobile.reactor.frm.future.FutureListener;
import com.pinganfu.mobile.reactor.frm.pipeline.Context;
import com.pinganfu.mobile.reactor.frm.pipeline.Event;


/**
 * Created by bieber on 2015/10/16.
 */
public class FirstInteraction extends ActionAdapter<FirstRequest, FirstResponse> {


    @Override
    public FirstResponse action(FirstRequest request) {
        FirstResponse firstResponse= new FirstResponse();
        firstResponse.setHello("hello world,"+request.getName()+"!");
        return firstResponse;
    }


}
请求实体:
package com.pinganfu.mobile.reactor;

import com.pinganfu.mobile.reactor.frm.export.InteractiveBaseRequest;

/**
 * Created by bieber on 2015/10/16.
 */
public class FirstRequest extends InteractiveBaseRequest {

    private String name;

    public FirstRequest(String name) {
        this.name = name;
    }

    public String getName() {
        return name;
    }
}
响应实体:
package com.pinganfu.mobile.reactor;

import com.pinganfu.mobile.reactor.frm.export.InteractiveBaseResponse;

/**
 * Created by bieber on 2015/10/16.
 */
public class FirstResponse extends InteractiveBaseResponse {

    private String hello;
    public FirstResponse() {
    }


    public String getHello() {
        return hello;
    }

    public void setHello(String hello) {
        this.hello = hello;
    }
}
五、把你的交互添加到你的module中
<reactor:module queueSize="10000" operationPath="/first_module" id="firstModule" weight="10">
    <reactor:interactions>
        <reactor:ref bean="firstInteraction"/>
    </reactor:interactions>
</reactor:module>
把上面的内容添加到spring的xml配置中
配置属性说明:
operationPath:当前模块的操作路径
queueSize:当前模块的能够处理队列大小,默认是0,表示使用同步队列,异步模式有效
weight:当前模块的权重,权重越大,获取的线程池大小越大(异步模式有效)
通过上面边完成了将reactor嵌入到你的项目中,下面贴出完整的xml配置:
<beans xmlns="http://www.springframework.org/schema/beans"
       xmlns:xsi="http://www.w3.org/2001/XMLSchema-instance"
       xmlns:reactor="http://mobile.pinganfu.com/schema/reactor"
       xsi:schemaLocation="http://www.springframework.org/schema/beans http://www.springframework.org/schema/beans/spring-beans-2.5.xsd
  http://mobile.pinganfu.com/schema/reactor http://mobile.pinganfu.com/schema/reactor/reactor.xsd">

       <reactor:reactor id="demo-reactor" systemName="hello" asynchronous="true" acceptorThreads="1" serviceThreads="100"/>

       <reactor:javaInteraction operationPath="first_module/first" minVer="3.2.2" maxVer="3.3.3" clientType="android" checkLoginState="false"  id="firstInteraction" class="com.pinganfu.mobile.reactor.FirstInteraction">

       </reactor:javaInteraction>

       <reactor:module queueSize="10000" operationPath="/first_module" maxVer="*" minVer="*" id="firstModule" weight="10">
              <reactor:interactions>
                     <reactor:ref bean="firstInteraction"/>
              </reactor:interactions>
       </reactor:module>
</beans>
通过上面的配置,只需要启动的时候加载上面的xml即可!
package com.pinganfu.mobile;

import com.alibaba.fastjson.JSON;
import com.dianping.cat.Cat;
import com.dianping.cat.message.Event;
import com.dianping.cat.message.Message;
import com.dianping.cat.message.Transaction;
import com.pinganfu.mobile.reactor.FirstRequest;
import com.pinganfu.mobile.reactor.FirstResponse;
import com.pinganfu.mobile.reactor.HelloRequest;
import com.pinganfu.mobile.reactor.HelloResposne;
import com.pinganfu.mobile.reactor.frm.ReactorAcceptor;
import com.pinganfu.mobile.reactor.frm.export.Acceptor;
import com.pinganfu.mobile.reactor.frm.export.ClientType;
import com.pinganfu.mobile.reactor.frm.export.InteractiveBaseResponse;
import com.pinganfu.mobile.reactor.frm.future.Future;
import com.pinganfu.mobile.reactor.frm.future.FutureListener;

import org.springframework.context.support.ClassPathXmlApplicationContext;

import java.util.List;

/**
 * Created by bieber on 2015/10/16.
 */
public class ReactorDemo {

    public static void main(String[] args) throws InterruptedException {
        ClassPathXmlApplicationContext applicationContext = new ClassPathXmlApplicationContext("classpath*:/spring/reactor.xml", "classpath*:/spring/applicationContext.xml", "classpath*:/spring/applicationContext-monitor.xml");
        final Acceptor reactorAcceptor = applicationContext.getBean(Acceptor.class);
        final FirstRequest request = new FirstRequest("bieber");
        request.setOperation("first_module/first");
        request.setClientVer("3.2.2");
        request.setClientType(ClientType.ANDROID);
        Future<FirstResponse> responseFuture = reactorAcceptor.fireMessageReceivedEvt(request,FirstResponse.class,null);
        //阻塞模式
        FirstResponse response = responseFuture.get();
        System.out.println(response.getHello());
        //非阻塞模式
        responseFuture.addListener(new FutureListener<FirstResponse>() {
            @Override
            public void operationComplete(Future<FirstResponse> future, Object attachment) {
                try {
                    FirstResponse response = future.get();
                    System.out.println(response.getHello());
                } catch (InterruptedException e) {
                    e.printStackTrace();
                }
            }
        });
    }
}
运行上段程序会得到下面的结果:
hello world,bieber!
hello world,bieber!